As I was settling into bed last night, I realized in a panic that I did not know where my cell phone was. I then instantly thought about how there was a time where I didn't need to constantly have my cell phone attached to me (practically) and on my bed side table every night. Even just several years ago my cell phone was not my life. Now I depend on it to wake me up, keep track of my schedule, and keep me current with emails.
When did we all get so plugged in? I mean I really am guilty of phone obsession, I wake up and reach over every morning to check my emails and the weather. This has been developing for years to the point where instead of leaving my phone in a purse or backpack after I went out, it has to be near me at all times.
What all this has to do with the New Year is more of an observance of how much technology has changed my life and the lives of society in just the past five years. With everyone so plugged in now people are expected to respond to everything immediately.
I know that when my parents went to school they did not get last minute changes to a schedule or new assignments via email. Now, as a student, I am expected to check my email every day, multiple times a day. If you miss an email that the professor sent out, even if it was at an insane hour of night, you are responsible to know its contents. Checking my email is easily done, but it is crazy when you consider how far emailing and technology have come.
I have heard of studies where students are separated from their phones and then go through withdrawal symptoms. According to an article from "The Telegraph" these withdrawal symptoms have been similar to the drug cravings experienced by an addict during rehab.
So I guess the question is do we really have a choice? I don't think I could really give up my phone for a week. I rely on it heavily at school for communicating with my parents, teachers, and my peers.
Could you give up your phone for a day, or even a week?
Sunday, December 30, 2012
Sunday, December 23, 2012
Christmas Craftacular: Making an Ornament Wreath
I know, Christmas is Tuesday! So what am I doing posting an ornament wreath DIY? Well, first of all it's a fantastic decoration and if you need to get a last minute gift made this comes together after one night of dedicated effort, oh and most importantly.....it sparkles.
Yes, I am using the dreaded craft supply-GLITTER. Keep in mind that it's only on a few Christmas balls. So will it cover you for about a day or so? Yes, but it sparkles and therefore is worth the trouble, not to mention it is the time of season to shimmer.
So for this wreath you will need several Christmas balls, an 18inch metal wreath base (can be found at a craft store), the green wire that is always in the same aisle as the wreaths, a hot glue gun, and ribbon- I bought 2 festive 3yd rolls and had another roll of silver ribbon.
Begin by checking your ornaments, if they are not connected tightly to the silver topper make sure to use your hot glue gun to secure their "hats". Arrange them in the order of facing outwards and then inwards.

Now that you have all your supplies ready you can start by laying out the ornaments and deciding how you want them to sit on the wreath. After deciding you will start connecting the balls, one by one, to the wreath with the wire.

Taking care to wrap the wire through the ornament top and around the wreath frame securely.
Then take your hot glue gun and put some hot glue on the wire and wreath. After you attach the next ornament go back and put some hot glue on the opposite side of ball so that it is glued on both parts.

Now that the balls are all on the wire frame you can make a bow with your ribbon and attach it to the wreath frame. I tied another piece of ribbon through the bow to hang the wreath. This piece is attached by a tightly wound piece of wire.

Then start to take pieces of your ribbon and secure them around the silver portion of the ornaments to hide the hot glue.

After all the ornaments are covered begin to take your larger ribbon and tie it securely all around the wreath.
This year when you are around the tree and tearing open your presents with smiling faces, remember that those to the left and right of you are what you truly need to be thankful for. The moments in our life that stand out are those when you are surrounded by the people you love. Remember to be grateful for spending your holiday season with them.
Yes, I am using the dreaded craft supply-GLITTER. Keep in mind that it's only on a few Christmas balls. So will it cover you for about a day or so? Yes, but it sparkles and therefore is worth the trouble, not to mention it is the time of season to shimmer.
So for this wreath you will need several Christmas balls, an 18inch metal wreath base (can be found at a craft store), the green wire that is always in the same aisle as the wreaths, a hot glue gun, and ribbon- I bought 2 festive 3yd rolls and had another roll of silver ribbon.
Begin by checking your ornaments, if they are not connected tightly to the silver topper make sure to use your hot glue gun to secure their "hats". Arrange them in the order of facing outwards and then inwards.


Taking care to wrap the wire through the ornament top and around the wreath frame securely.
Then take your hot glue gun and put some hot glue on the wire and wreath. After you attach the next ornament go back and put some hot glue on the opposite side of ball so that it is glued on both parts.

Now that the balls are all on the wire frame you can make a bow with your ribbon and attach it to the wreath frame. I tied another piece of ribbon through the bow to hang the wreath. This piece is attached by a tightly wound piece of wire.

Then start to take pieces of your ribbon and secure them around the silver portion of the ornaments to hide the hot glue.

After all the ornaments are covered begin to take your larger ribbon and tie it securely all around the wreath.
Hope you have a wonderful holiday season!
This year when you are around the tree and tearing open your presents with smiling faces, remember that those to the left and right of you are what you truly need to be thankful for. The moments in our life that stand out are those when you are surrounded by the people you love. Remember to be grateful for spending your holiday season with them.
Monday, December 17, 2012
Getting Ready For Christmas: Easy Decorating Ideas
With less than 10 days left until Christmas, I can definitely feel the tension growing, as more people pack stores and traffic on the weekends grows. So to make your holiday decorating a little easier here are some easy and quick ideas for decorating your tables.
Don't get me wrong, I do love poinsettias and the traditional centerpiece of flowers with lit candles, but for something fool proof (and something your cat can't eat) here are some ideas.

This makes such a cute centerpiece. Just get a few decorative/festive ducks or other animal and put them on top of a holiday fabric. Spread some jingle bells around them and you have an adorable table in no time.

Adding a few snowflakes, which you can buy or make with a scrapbooking punch, creates a special touch.

You can pick up reindeer at your local craft store. Take some scarfs and tie them into bows. Red really makes the reindeer pop.
Happy Decorating!
Sunday, December 2, 2012
Labor of Love: A Good Pot Pie
Hi everyone! I am sure it is going to be getting busy for you soon, whether it is with school, work, or holiday preparations. I know my little workshop will be busy this week with jewelry making and knitting. At this time of year when it is getting colder it is nice to have a good pot pie. This is Ina Garten's recipe, but changed to my own taste with lots of extra veggies and more chicken. My changes to the recipe increase the amount of pot pies from 4 to 11 so that there are extras to freeze.
Ingredients (makes about 11 individual pot pies)
Two Rotisserie Chickens
Kosher Salt
Black Pepper
5 cups chicken stock (I use regular chicken broth)
2 chicken bouillon cubes (or a chicken paste if you can get it!)
1/2 stick of butter
2 cups yellow onions, chopped (2 onions)
3/4 cup all purpose flour
1/4 cup heavy cream
2 large carrots
2 containers of pre-sliced baby bella mushrooms (cook these in a pan before adding)
2 bags of the steam fresh mixed vegetables
1/2 cup minced fresh parsley
For the pastry covering
I just use pre-made pie crusts- you will need 2 packages
You cut them down by using one of the pie tins as a template.
Then you follow the instructions as given on Foodnetwork. I also skip making my own chicken and just use the meat of two rotisserie chickens, giving you plenty of meat and less work.
Preheat your oven to 375
"In a small saucepan, heat the chicken stock and dissolve the bouillon cubes in the stock. In a large pot or Dutch oven, melt the butter and saute the onions over medium-low heat for 10 to 15 minutes, until translucent. Add the flour and cook over low heat, stirring constantly, for 2 minutes. Add the hot chicken stock to the sauce. Simmer over low heat for 1 more minute, stirring, until thick. Add 2 teaspoons salt, 1/2 teaspoon pepper, and heavy cream. Add the cubed chicken, carrots, peas, onions and parsley. Mix well."
Cut down the pie crusts to be slightly larger than your tins so you can cover them. Fill your tins with the mixture and then top them. Then take a fork to poke several holes in your crust. I like to do a cross when I do this.
Put your pies in the oven for 45-60 minutes (or until bubbling with crispy crust)
Whatever pies I am not using immediately I cover with tin foil to cover the uncooked pastry crust and then wrap the entire pie in plastic wrap. I like having these pies in the freezer because you can take them out the night before you want them to defrost in your fridge and then just pop them in the oven for an hour, making an easy and delicious dinner for you!
Happy Cooking!
On another note......
Keep your eyes peeled this week! I will be having a Beyond Measure jewelry give-away. All you will need to do to enter is to like my Facebook page and share the photo of the prize for the chance to win! I will announce the winner on December 12th and then inbox them for their address.
Tuesday, November 27, 2012
Making Your Christmas Bright : DIY Style
With our bellies still aching from Thanksgiving dinner and black Friday behind us, it is truly time to start thinking about Christmas. My tree is already up and decorated and I am starting to see Christmas lights. While bought gifts can be fantastic, I am a huge fan of DIY Presents. So I have put together a small collection of ideas from fabulous blogs. Just click on the picture to go directly to the blog :D
These would be a great gift for anyone because you can personalize them to any occasion. If your friends were recently married you could put pictures of them on the coasters or customize it to a particular interest.
Who doesn't love a spa day? With this DIY you can give your mother or sister a deserved day of relaxation.
This scarf is absolutely adorable and for those of you who sew a perfect gift to make!
I absolutely LOVE jewelry! Making it, wearing it, going through pages of pictures of baubles. This fun DIY is a perfect gift for the on trend girl.
I hope this helps you all start towards your holiday gift giving goals!
 |
| Credit to Mom 4 Real |
These would be a great gift for anyone because you can personalize them to any occasion. If your friends were recently married you could put pictures of them on the coasters or customize it to a particular interest.
 |
| Credit to Martha Stewart |
Who doesn't love a spa day? With this DIY you can give your mother or sister a deserved day of relaxation.
 | ||
| Credit to Put Up Your Dukes |
This scarf is absolutely adorable and for those of you who sew a perfect gift to make!
 | ||
| Credit to For the Love Of... |
I absolutely LOVE jewelry! Making it, wearing it, going through pages of pictures of baubles. This fun DIY is a perfect gift for the on trend girl.
I hope this helps you all start towards your holiday gift giving goals!
Happy Crafting!
Sunday, November 18, 2012
In the Kitchen With Krissia
Hello world! Finals week is over and I am home again and resurfacing to the world with a pumpkin pie recipe from my friend, Krissia. With Thanksgiving this week, pies, goodies, and turkey is on my mind. This recipe is really quite yummy-can't beat a graham cracker crust.

Here's the recipe
**the recipe makes 1 and 1/2 pies so you can easily double it to make three or freeze excess batter**
Crust (for one pie)
1 1/2 cups graham cracker crumbs
6 tbs butter-melted
1/4 cup granulate sugar
1/4 tsp cinnamon
Filling
2 whole eggs
2 egg yolks
1/4 cup dark brown sugar
1/4 cup granulated sugar
3 tbs melted butter
1 1/2 cups pumpkin puree
1 1/2 cups heavy cream
1 1/4 tsp cinnamon
1 tsp ginger
1/2 tsp nutmeg
1/4 tsp cloves
1/2 tsp salt
1 tsp vanilla extract
*preheat your oven to 350 degrees F. for the crust and lower it to 275 degrees for the filling*


Here's what you will need

Here's the recipe
**the recipe makes 1 and 1/2 pies so you can easily double it to make three or freeze excess batter**
Crust (for one pie)
1 1/2 cups graham cracker crumbs
6 tbs butter-melted
1/4 cup granulate sugar
1/4 tsp cinnamon
Filling
2 whole eggs
2 egg yolks
1/4 cup dark brown sugar
1/4 cup granulated sugar
3 tbs melted butter
1 1/2 cups pumpkin puree
1 1/2 cups heavy cream
1 1/4 tsp cinnamon
1 tsp ginger
1/2 tsp nutmeg
1/4 tsp cloves
1/2 tsp salt
1 tsp vanilla extract
*preheat your oven to 350 degrees F. for the crust and lower it to 275 degrees for the filling*

combine butter, graham crackers, and melted butter

Once mixed, put the mixture in the pie pan and press around. You can use a cup to create an even edge. Cook the crust for 10-15 minutes at 350.

Combine the eggs, yolks, and sugar in the large bowl.

Add melted butter, pumpkin, cream, spices, salt, vanilla and whisk the mixture.

Fill crust and bake for 90 minutes

Now there is only one thing to do, ENJOY!
Happy Baking and Happy Thanksgiving!
Sunday, October 21, 2012
Fashion Showdown!
These recent weeks have been very hectic with school! Last week, Friday was the A&F Fashion Showdown( Abercrombie and Fitch) where people compete for around 5 hours creating outfits from the fabric provided. And after that was over I headed over to the metals studio to work on my geometric necklace!
So basically we are told all the rules and then sent to our respective rooms to begin work on our dresses. We could not start until 11:30 and spent that time brainstorming and sketching. Which basically looks like people throwing fabric around and "trying it on" in an attempt to figure out what we wanted to do.

We decided we wanted to do something structured on top with folds and then some soft draped fabric in contrast to the structured look. The belt is done macrame style and then there are tiny safety pin black ribbon details on the blue skirt.


.jpg)
.jpeg)
.jpg)
.jpg)

 | ||
| Anna working on the poofed out skirt |
So basically we are told all the rules and then sent to our respective rooms to begin work on our dresses. We could not start until 11:30 and spent that time brainstorming and sketching. Which basically looks like people throwing fabric around and "trying it on" in an attempt to figure out what we wanted to do.

We decided we wanted to do something structured on top with folds and then some soft draped fabric in contrast to the structured look. The belt is done macrame style and then there are tiny safety pin black ribbon details on the blue skirt.

We wanted the back to be delicate and have a sheer lace back. I think that worn you would better see the effect of the lace back.

The front of the skirt is cut higher than the back. If we were to do it again and had more fabric we would have done a bubble skirt on the bottom instead of the long skirt.
.jpg)
.jpg) |
| Absolutely loved this dress. Wouldn't it be perfect for a Cleopatra costume? |
.jpeg)
.jpg)
.jpg)
Here is a look at some of the other dresses

And here's us with our dress at the reception!
Sunday, October 7, 2012
Kickstarter Cracked Open: An Interview with a Kickstarter Innovator
Preston Turk, student at Northeastern University, has been tinkering with watches and fascinated by the way things work since he was young.

Recently, he launched a product of his own, the "Stow-away Lens Cap Holder" on Kickstarter (A site that helps individuals get funding for their products) and I thought it would be interesting to chat with him about his innovation and recent launch!
Q- What is Kickstarter?
PT- Kickstarter is a crowdfunding website, which means it uses the power of all its users to help entrepreneurs and artists fund their projects. I'll illustrate this with my story. I created this product and prototyped it, but the cost of a mold is high, and I want to gauge if the market wants it. So I create a campaign with my goal price being the lowest I can get and still afford the mold and parts. The theory behind this is if I don't get enough money, I would not be able to make it. Kickstarter is set up so that if I do not reach the goal amount no money changes hands. When Kickstarter users pledge money they are promised a reward if the project is successfully funded and their account is charged for the pledge. It really is a great system, and allows entrepreneurs and artists a way to get customers and gauge potential interest in their product.

Q-What inspired this product?
PT-This product was inspired like many [innovations] of mine, which was by an annoyance at something that could be done better. In this case, it was the strings that attach your lens cap to your camera. For me, they were always getting in my way. When I was shooting downwards and when shooting upwards it would get in my face. I knew I needed to make something better, that was also faster than just putting it in your pocket.

Q-How long have you been working on the "Stow-away"?
PT- I came up with the idea for this cap holder in February, but started working on it more seriously when another project of mine stopped temporarily this summer. So, I've been working on this project together with and engineer for the past four months or so.

Q- What has been the most exciting part of this project?
PT- The most exciting part of this project has been receiving the prototypes and developing the design into something that I feel performs well and looks good. We went through several iterations, from a fully round plastic design but ran into problems because the thread would break inside the camera, and the full round [version] was too big. So we the cut the sides off on the design, and used a machined thumb screw to hold it on, and added cork backing to keep it soft against the camera.

Q-What has been the most challenging part of this project?
PT- The main challenge of this project has been insuring good moldability of the design with the manufacturer. We wanted to make sure it could be produced, while also retaining the qualities that we need for it to work well. To ensure this, we worked with the factory to produce the best design.
This product is currently up for funding on Kickstarter. Any amount of money can be pledged ranging from $1.00 and up! Depending on how much you pledge you will get your own "Stow-away"! You can go to his page and help fund this product.
Thursday, October 4, 2012
I Have Joined The Twitter World!
It's official! I have finally joined Twitter! Follow me in order to keep up with all of my creations and blog posts. I will be updating my Twitter with news about my projects and ideas and so on. :)

Samantha F. @SamanthaFo22
Sunday, September 30, 2012
What A Reese's Peanutbutter Cup Wants to Be!
Peanutbutter Balls
These delicious poppable bites of peanutbutter and chocolatey goodness will disappear from your fridge within days! This is a family recipe that has been keeping everyone happy around the holidays for years. This time around I made them for my friends Krissia and Ana-needless to say the treats won't be around for long.
For this recipe you will need powdered sugar, peanutbutter, a stick of butter, and melting chocolate from the store. ( I used candiquick this time. The original recipe calls for chocolate chips and paraffin wax in a double boiler, but the store bought chocolate is a nice time saver!)
1 stick of butter
1 cup of peanutbutter
1 cup of powdered sugar (half of the typical box)
Melting chocolate I use about 2/3 of what is in the package

First melt your butter in a large bowl


After the butter is melted, mix in a cup of peanutbutter.

Now add about a half a box of powdered sugar, or just until it comes together pretty well. You will want it to come together enough so that you can roll it easily. I like to do the half of a box and then put the mixture into the fridge so it becomes firm.


Now roll out your peanutbutter balls. I like to have either a piece of wax paper or a piece of tin foil sprayed with non stick spray.

Melt your chocolate. Make sure to stir it between the microwave times and not leave in the chocolate for longer than 30 second intervals. You don't want to burn your chocolate.
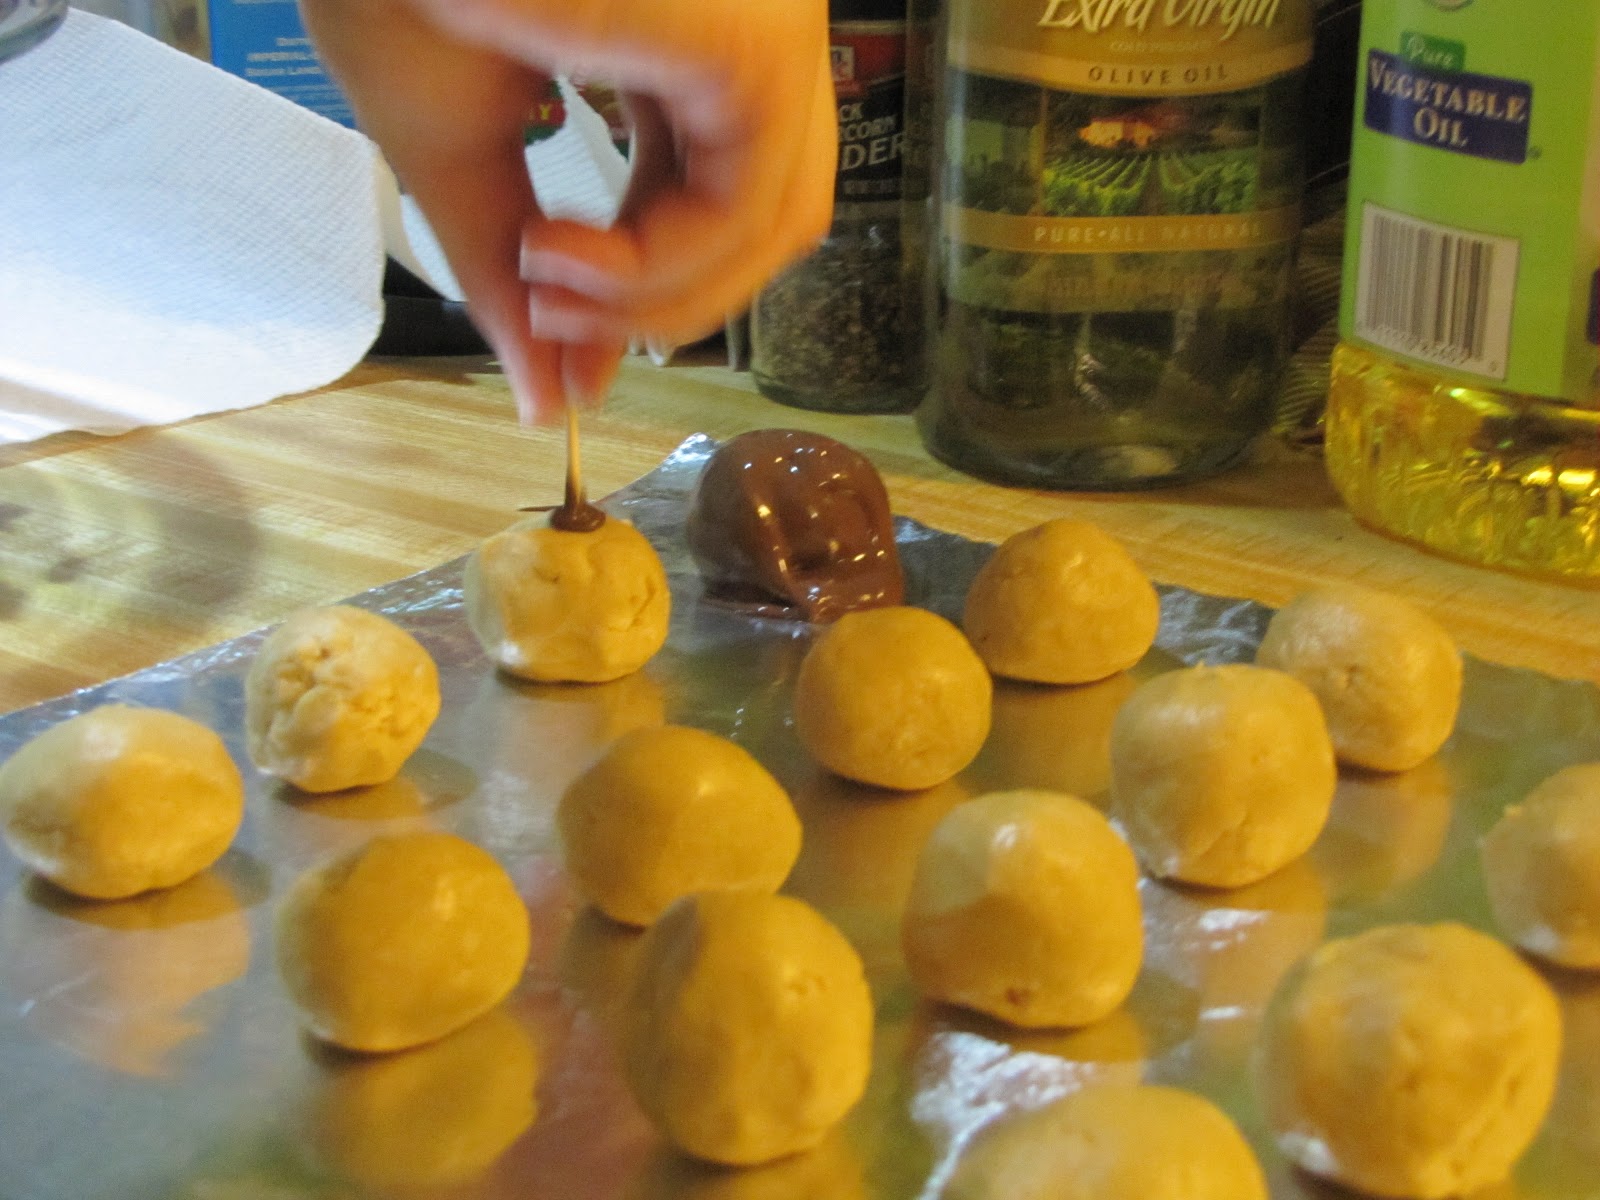
Once the chocolate is melted you can use a toothpick to dip your peanutbutter balls in the chocolate.
 | |||
| The peanutbutter bowl got some attention from my friends haha |

After dipping all the balls in chocolate, and licking the mixing forks a few times haha, put the candies in the fridge so that the chocolate can harden. Keep the peanutbutter balls refrigerated. ENJOY!
 | |||
| These really are oh soo good! |
Happy Baking!
Sunday, September 23, 2012
It's What Is In The Hand
I have been searching for weeks for the perfect paper to use for my business card. I ordered a pattern I loved on 80 lb paper hoping it would be solid and sturdy feeling. Apparently 80lbs is the average weight for paper that gets used for business cards. There was this beautiful taupe ecru pattern, but upon receiving the paper and printing out test cards I decided that 80lbs creates a far too flimsy business card.

There is a psychological factor in what you receive from people. In my media lit. class in high school we read a study that discussed a scenario where a person was handed either a cold drink or hot cup of coffee by someone they had never met before. The scenario played out in such a way that the person with the drink would need the other person to hold their drink for a moment. Those asked to hold a cold beverage later described the person as being cold, and those who were asked to hold a hot drink found the person to be warm later on.

I can not help but assume that his can apply to what kind of business card you are handed when you meet someone. If that person receives a flimsy business card then they would associate you with not being substantial whereas I want them to feel that I am a person of substance. I want to hand them a card that is as sturdy and dependable as I am.

While I was searching for a company with patterned 100lb paper, I came to the conclusion I would simply have to make my own patterned paper. So now I am in the process of making my own pattern on illustrator.

Along the way I discovered several other methods used in creative business cards. One company, called Pure Metal Cards , laser cuts their business cards from sheet metal. I am sure that they give a lasting impression, however at over six hundred dollars for 200 hundred cards, I think I will be sticking with paper. I do really like the idea of a stainless steel card, I am sure if you are handed one you won't want to throw it out, I know I would not!

There is a psychological factor in what you receive from people. In my media lit. class in high school we read a study that discussed a scenario where a person was handed either a cold drink or hot cup of coffee by someone they had never met before. The scenario played out in such a way that the person with the drink would need the other person to hold their drink for a moment. Those asked to hold a cold beverage later described the person as being cold, and those who were asked to hold a hot drink found the person to be warm later on.

Aren't these so cool?
I can not help but assume that his can apply to what kind of business card you are handed when you meet someone. If that person receives a flimsy business card then they would associate you with not being substantial whereas I want them to feel that I am a person of substance. I want to hand them a card that is as sturdy and dependable as I am.

While I was searching for a company with patterned 100lb paper, I came to the conclusion I would simply have to make my own patterned paper. So now I am in the process of making my own pattern on illustrator.

Along the way I discovered several other methods used in creative business cards. One company, called Pure Metal Cards , laser cuts their business cards from sheet metal. I am sure that they give a lasting impression, however at over six hundred dollars for 200 hundred cards, I think I will be sticking with paper. I do really like the idea of a stainless steel card, I am sure if you are handed one you won't want to throw it out, I know I would not!
Keep an eye out for next week's post! It's going to be a sweet one!
Subscribe to:
Posts (Atom)