Friday, August 31, 2012

Halloween Cupcakes


I love Halloween and adore baking, so I decided to come up with a few fun decorating ideas that you can easily make! These cupcakes would be crowd pleasers at parties and a wonderful activity to do with kids. 

A Coating of Cookies

First things first! You need to get together some cupcakes and frosting. I used a yellow cake recipe I found on foodnetwork and the frosting recipe off of the back of the Hershey's Dark Cocoa. I decided to use black and white polka dot wrappers to keep the Halloween feeling through-out.


 Simply Ice


And then apply the crumbled oreos. I like to put the cupcake down in the crumbles and twist it gently to get every part covered. It is really easy to crumble the oreos yourself you just put the chocolate cookie part in a plastic bag, seal it, and roll over the cookies with a rolling pin. You will want to save the cream centers for the first cupcake. 

Eye Popping Cupcakes

  For these cupcakes you will need chocolate chips, candy corn, and the cream centers of oreos. 


Press a chocolate chip into the center of the cream. Then put a dab of icing onto the cupcake to "glue" the eye into place. To finish off the look line the eye with candy corn. Now you have yourself a set of cute eyes.

Spider Toppers

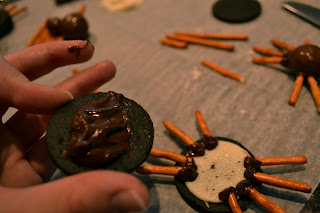
For the first spiders you will need oreos, melted chocolate, and pretzel sticks.

 
Open up your oreo cookies and dip the end of the pretzel sticks into the chocolate. Break them in half so that the legs look proportional to the cookie. 


Add some melted chocolate to the cookie and close the spider up.


Top your cupcake by adding some icing where your spider will go and place him on top, then enjoy!

Spooky Spider Cupcake 

For this spider you will need melted chocolate, malt balls (or another spherical candy), and pretzel sticks. This decoration requires more care and patience. 
 

To begin use some chocolate to attach a head. Let it set. The begin to apply pretzel stick legs slowly allowing each to set. The result is a tasty and spooking little spider atop your cupcake! Remember a little icing for "glue".

Ghastly Ghosts
 For this decoration you will need white chocolate (that you will melt), wax paper or parchment and chocolate chips.


Melt your chocolate in the microwave , do this in 15 to 30 second increments. Make sure that you are stirring inbetween. Your chip will keep its shape in the microwave and fool you into thinking it is not melted, so be sure to stir! Once the chips are melted enough to stir, use a fork to spread the chocolate onto the wax paper and let the chocolate set.


Once the chocolate has set peel it off. I recommend lifting the paper and peeling away the paper. Then take two chocolate chips and dot them with some chocolate and add them to your ghost. You can just stick these ghosts into the cupcake and they will stay. Isn't he cute?

Ghoul Worthy Gravestones

You will need oreos, melted white chocolate, and toothpicks for these. 


 To do these gravestones simply use your toothpick to write R.I.P on the cookie with the white chocolate. Then you can let the chocolate set. 


Once it is set, press the cookie into the cupcake with a little icing to keep it in place.


Now you can have some fun setting up scenes with your cupcakes, like little graveyards. 

Happy Baking !


Sunday, August 26, 2012

Autumn Fever

Yesterday morning it started to feel like fall, one of my favorite times of year! I have begun thinking already about how I will decorate this year and what wonderful treats I will create. (Keep an eye out for some cute Halloween cupcake ideas!) I changed the look of my blog to go along with the changing of the seasons to create a cohesive look. In anticipation for the coming season I decided to go through Etsy and find inspiring decorations to share with you. I hope these start getting you into the decorating spirit.

How cute is this for Halloween? It has wonderful hand painted details and large, expressive eyes.


These adorable pillows add a subtle and sophisticated seasonal pop of color to the room. I also like how they can work for Halloween and Thanksgiving.


These adorable pumpkins are felted. I love the warmth that the medium brings to the subject. They are so well done they look real.

I have loved jack o'lanterns ever since I was little. They are always so fun to make. What is so cool about this piece is that is actually a gourd so it lasts. His face just makes me happy looking at it!


A lot of the time I find a lot of wreaths to be overly fussy, but this wreath is whimsical and feels like nature. The colors are so wonderful and embody the leaves that make fall so beautiful. I think this piece works well for both Halloween and Thanksgiving.


Sunday, August 19, 2012

D.I.Y Photo Transfer


Using Tar Gel


All across the internet I have seen the photo transfer method of using gel medium to put a photo onto other surfaces. So I decided to give it a try for my parents anniversary gift this year. In all I ended up experimenting with gel medium, tar gel, and Mod Podge photo medium (my favorite!).

My initial attempt with regular gel medium came out badly because my father's face got very smeared and I decided to paint over it and use it for another project. The above canvas was done with Tar gel. I know that everyone said online that you will not get perfect results and I like the flaws, but I wanted to see if I could find something that would create better results in transferring detailed photos.

Done with Mod Podge

I went to Michaels and found the Mod Podge section. There is a special type called the photo transfer medium, used for fabric and I figured I could use that for a better photo transfer effect on the canvas. It turns out that using the Mod Podge is also an easier and more reliable way of transferring your photo.

Here's What You Will Need!


To create your own canvas transfer you will need Mod Podge, a canvas (I chose 8X10), a sponge brush, a photocopied version of your photo, and a sponge. If you want to you can also get chipboard letters to glue on at the end like I did for the anniversary gifts. 

The flipped version. You can do this in preview of the photo on your desktop if you go under tools and click flip horizontal.

You will want to first cut down your photo so there is not extra white paper around. In this version you are about to see I chose to see what would happen if I used my home printer to print a horizontally flipped version so that it would not be reversed on the canvas. *NOTE* Unless you flip your photo your image will end up as a mirror image on the canvas. 


Next take your Mod Podge and start to brush it onto the photo. Make sure to be generous in coating the paper. 

I did two coats

Then flip your paper over and onto the canvas. Smooth the paper outwards from the center to ensure that your photos will transfer smoothly and without bubbles. Now the hard part, -At least if you're me!- wait 24 hours before you proceed to the next step.


To remove the paper and reveal your image you will need to wet a sponge. I cut a regular kitchen sponge in half for this because I find it easier to handle. Now simply start to rub away at the paper. 
As you continue the process make sure to re-wet the sponge, the sponge should not be sopping wet but wet enough to loosen the paper.
 

As you are rubbing away the paper it will ball. To keep everything neat I find it useful to have a paper towel to put them on. As you get to the point where you have almost all the paper off you can use a towel to knock off the paper into the garbage. Then go back and rub at spots that have the paper still and use the paper towel again. 


Now you can admire your work and happily hang it up somewhere. Or if you want an extra touch on the picture you can glue on some chipboard letters like I did in the anniversary present. This makes an excellent gift and is a wonderful way to transform your wedding photos. This is right after finishing the picture so it is still wet and has not flattened completely yet. Once everything dries completely it will be a flat surface

*Note* you may notice that my picture has a slight purple hue, this is a result of having printed it from my computer, unless your printer is exclusively B&W then your printer will likely use dark purples to create blacks like painters do. I personally kind of like the purple tint, but obviously if you want true colors in B&W ensure that it is a B&W photocopy not printed from a color printer.

Saturday, August 11, 2012

D.I.Y Button Mirror

Pier One Mirror
I have noticed that there are tons of fabulous mirrors out there lately and many of them have elaborate borders. While this mirror (above) from Pier one is really very cool, I just feel like there are ways of getting an equally fabulous mirror without the  $179.95 price tag.

So with inspiration in hand I thought of how anybody with lots of buttons could easily achieve  a dazzling affect with their own D.I.Y mirror.

Tons of buttons that I got from Michaels years ago

 To make your own mirror you will need cardboard ( you could use wood or foam board too, but if you use foam board be sure not to use spray paint because it will melt), lots of buttons that you like, glue, some paint, a mirror, and flush cut pliers.


The first thing you will want to do is to prepare a circular piece of cardboard.  I used a piece of string in order to create the circle.  I used two pieces of gift box cardboard that I glued together so I could start with a white surface.


You can center your mirror by intersecting lines  and then doing the same on the back of your mirror and marking these with tape. If you match up the intersecting lines then you will have it centered perfectly. 


 I chose to paint the background after the mirror was glued down so I could create a texture that outlined the mirror perfectly, but you can paint the cardboard first if you would prefer. I used a silver paint and sponge brush to create the texture. If you do paint first just remember to mark the cardboard lightly with the pencil so you can erase it later. You may also like to paint the back, this will ensure that the cardboard remains a level surface.  


Next take your flush cutting plier and begin to cut off the backs of your plastic buttons so they will lay flat on the board. 


 If your buttons are multilayered then take them apart if possible and use your flush cutters. Then glue the two pieces together and wait for everything to dry. 


 Once you have a good amount of buttons prepared start laying them out around the mirror in a way you like. I put them down in a corner to corner kind of way to create a lace sort of effect.


You will want to set all the buttons down and make sure you like the look and have it set out evenly before you start gluing. Once everything is set down go ahead and begin to glue!


For the back of the mirror I simply cut a piece of ribbon to the length that looked appropriate and glued it down.   


And voila! You have your very only fabulous mirror for a fraction of the price. The best part? The mirror will be exactly what you want. I went for a more vintage glamor look with multiple pearl buttons.